We are excited to announce the new features included in the CARLA 0.9.7 release!
This release brings the long-awaited traffic manager. We have also worked on improving our sensor suite, adding a new IMU sensor and our first RADAR implementation. Furthermore, the camera model has been extended to give control over additional parameters, such as lens distortion, exposure time, and many others. You will also find a new customizable pedestrian navigation module, and illumination improvements, among many other features and fixes.
Let’s take a detailed look at the new features!
A flexible-and-efficient Traffic Manager!
The Autopilot has been recently replaced by the first version of the Traffic Manager !! This new module is built on client side, leveraging the C++ CARLA API, with the objective of providing a more configurable way of controlling traffic, while reducing the overhead of the server. The main objevtive of the Traffic Manager is to improve the way cars roam around the city, whilst giving users the option to customize traffic like never before. To achieve this, we have built an architecture that allows users to pass information through several stages and manage shared data structures.
The Traffic Manager allows users to interact with a list of parameters:
- Distance to leading vehicle
- Allow speed above limit
- Percentage of velocity reduction from the speed limit
- Percentage to respect “keep right” rule
- Percentage of running a traffic light
- Ignore pedestrians
- Ignore other vehicles
- Force a lane change
- Turn lane changes on/off.
- Percentage of overtaking, when possible
- Percentage to avoid tailgating, when possible.
Extended sensor suite!!
RADAR
Description
A new RADAR sensor has been added to CARLA. This first implementation brings a low-fidelity RADAR sensor with the goal of having a suitable placeholder to complete the sensor suite. The new RADAR uses raycasting to obtain returns from objects and estimates range, azimuth, altitude and velocity. The two main classes to control the RADAR are RadarMeasurement and RadarDetection. Please, check the API! document
and the example below for further information.
Code example
...
# Get radar blueprint
radar_bp = bp_lb.filter('sensor.other.radar')[0]

# Set Radar attributes, by default are:
radar_bp.set_attribute('horizontal_fov', '30') # degrees

radar_bp.set_attribute('vertical_fov', '30') # degrees

radar_bp.set_attribute('points_per_second', '1500')
radar_bp.set_attribute('range', '100') # meters


# Spawn the radar
radar = world.spawn_actor(radar_bp, carla.Transform())

# Create a radar's callback that just prints the data
def radar_callback(weak_radar, sensor_data):
    self = weak_radar()
    if not self:
        return
    for detection in sensor_data:
        print('depth:    ' + str(detection.depth)) # meters

        print('azimuth:  ' + str(detection.azimuth)) # rad

        print('altitude: ' + str(detection.altitude)) # rad

        print('velocity: ' + str(detection.velocity)) # m/s


weak_radar = weakref.ref(radar)
# Bind the callback
radar.listen(lambda sensor_data: radar_callback(weak_radar, sensor_data))
Visualization example
We have created some examples to visualize the RADAR data. In those examples rhe red intensity means negative speed, and the blue one refers to positive speed in sensor coordinates. range (meters), azimuth (radians), and elevation (radians) are used to calculate the 3d position of each detection.
Radar speed information with the RGB camera
The example shows a vehicle approaching from the right side of an static RADAR.

Inertial Measurement Unit (IMU)
Added support for real-time IMU and Radar data visualization in manual_control.py.
New IMU sensor that provides:
- Accelerometer (m/s2)
- Gyroscope (rad/s)
- Compass (rad)
Added new noise atributions:
sensor.other.imu
    Attributes:
        noise_accel_stddev_x (Float)
        noise_accel_stddev_y (Float)
        noise_accel_stddev_z (Float)
        noise_gyro_bias_x (Float)
        noise_gyro_bias_y (Float)
        noise_gyro_bias_z (Float)
        noise_gyro_stddev_x (Float)
        noise_gyro_stddev_y (Float)
        noise_gyro_stddev_z (Float)
        noise_seed (Int)
Exntended sensors
Extended camera sensor
We have added more control over the RGB camera sensor, so you can create new configurations beyond the basic pinhole model. All the currently available RGB camera settings can be modified as follows:
# Sensor

camera_bp.set_attribute('sensor_tick', str(0.0))

# Image

camera_bp.set_attribute('image_size_x', str(800))
camera_bp.set_attribute('image_size_y', str(600))
camera_bp.set_attribute('gamma', str(2.2))

# Camera (used for manual exposure and depth of field)

camera_bp.set_attribute('fov', str(90.0))
camera_bp.set_attribute('shutter_speed', str(60.0))
camera_bp.set_attribute('iso', str(1200.0))
camera_bp.set_attribute('fstop', str(1.4)) # Aperture is 1.0 / fstop

camera_bp.set_attribute('min_fstop', str(1.2)) # Maximum Aperture

camera_bp.set_attribute('blade_count', str(5))

# Exposure ("manual" by default)

camera_bp.set_attribute('exposure_mode', str('manual'))
camera_bp.set_attribute('exposure_compensation', str(3.0))

# Exposure - histogram specific (used when "exposure_mode" == "histogram")

camera_bp.set_attribute('exposure_min_bright', str(0.1))
camera_bp.set_attribute('exposure_max_bright', str(2.0))
camera_bp.set_attribute('exposure_speed_up', str(3.0))
camera_bp.set_attribute('exposure_speed_down', str(1.0))
camera_bp.set_attribute('calibration_constant', str(16.0))

# Depth of field

camera_bp.set_attribute('focal_distance', str(1000.0))
camera_bp.set_attribute('blur_amount', str(1.0))
camera_bp.set_attribute('blur_radius', str(0.0))

# Motion Blur

camera_bp.set_attribute('motion_blur_intensity', str(0.45))
camera_bp.set_attribute('motion_blur_max_distortion', str(0.35))
camera_bp.set_attribute('motion_blur_min_object_screen_size', str(0.1))

# Tonemapper

camera_bp.set_attribute('slope', str(0.88))
camera_bp.set_attribute('toe', str(0.55))
camera_bp.set_attribute('shoulder', str(0.26))
camera_bp.set_attribute('black_clip', str(0.0))
camera_bp.set_attribute('white_clip', str(0.04))

# Color

camera_bp.set_attribute('temp', str(6500.0))
camera_bp.set_attribute('tint', str(0.0))

# Other

camera_bp.set_attribute('enable_postprocess_effects', str(True))
in this example they all are set to the default value
More information about these attributes can be found in the UE4 official docs:
Lens distortion
Now all the camera-based sensors (RGB, Depht and Semantic Segmentation) are provided with and additional lens distortion shader. You can see the effect of just increasing the lens_circle_multiplier value to 1.0 - 2.0.
camera_bp.set_attribute('lens_circle_falloff', str(5.0))
camera_bp.set_attribute('lens_circle_multiplier', str(0.0))
camera_bp.set_attribute('lens_k', str(-1.0))
camera_bp.set_attribute('lens_kcube', str(0.0))
camera_bp.set_attribute('lens_x_size', str(0.08))
camera_bp.set_attribute('lens_y_size', str(0.08))
Also, exposed chromatic aberration for sensor.camera.rgb:
rgb_camera_bp.set_attribute('chromatic_aberration_intensity', str(0.5)) # 0.0 by default

rgb_camera_bp.set_attribute('chromatic_aberration_offset', str(0.0))
Changed manual_control.py so you can visualize a lens distortion example pressing 8.
GNSS
Moved the GNSS sensor from client to server side.
Advantages
- Fewer calculations on the client-side.
- Exactly the same output for different clients listening to the same sensor.
Limitations
- More calculations on the server-side.
- More networking traffic.
Added new noise atributions:
sensor.other.gnss
    Attributes:
        noise_alt_bias (Float)
        noise_alt_stddev (Float)
        noise_lat_bias (Float)
        noise_lat_stddev (Float)
        noise_lon_bias (Float)
        noise_lon_stddev (Float)
        noise_seed (Int)
API changes
We had to make some changes in the API in order to implement new functions related to sensors. These are the new API changes:
- Lidar:
rangeis now set in meters, not in centimeters - Lidar:
horizontal_angleis now received in radians, not in degrees - GNSS:
carla.GnssEventrenamed tocarla.GnssMeasurement
New Pedestrian Navigation module
With this new feature users can control and define the path that pedestrians will follow automatically, which can be controlled using the CARLA API! Now it is possible for pedestrians to automatically cross enabled walkways (sidewalks and crosswalks) using a new AI system.
It is possible to create your own enabled walkways for pedestrians with:
- Carla Exporter
- Binary Generator
Check it out in our tutorial!
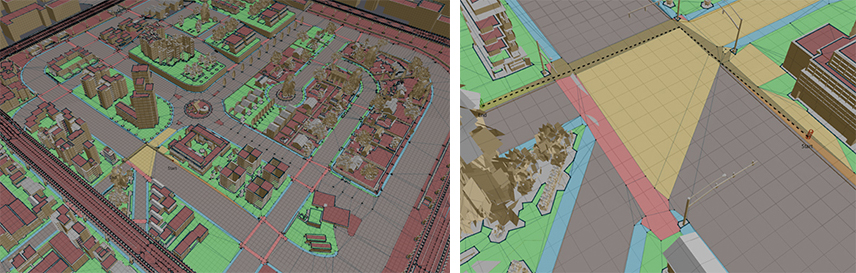
Semantic segmentation for pedestrian navigation created with our plug-in Carla Exporter and Binary Generator
Users can set a % of pedestrian who will cross randomly over the roads. They can also set the pedestrian speed between walking or running.
# set how many pedestrians can cross the road (10%)

world.set_pedestrians_cross_factor(0.1)
if walker_bp.has_attribute('speed'):
  if (random.random() > 0.5):
    # walking

    walker_speed = walker_bp.get_attribute('speed').recommended_values[1]
  else:
    # running

    walker_speed = walker_bp.get_attribute('speed').recommended_values[2]
The pedestrians are now aware if there is a car near by when they are going to cross a crosswalk and act accordingly.
Improved Pedestrians
New pedestrian animations and controller
We have improved the pedestrian animation controller. In addition to improving their animations we have added a new animation state. Latest changes in animation include animation clips from Mocap sources to increase realism.
The basic controller included walk, run and idle state/animations. There is also a new state: pivot. This stae covers situations in which pedestrians are stationary, but reorienting themselves to face a different direction.
All these additions have been designed to improve in pedestrian’s navigation, and to produce more natural behaviors. Nevertheless, the team will continue increasing the realism of pedestrian in future releases.
New pedestrian skin shader
We have also made a few improvements to pedestrian’s materials. New materials are created using SSS (SubSurface Scattering) shader for the skin.
New illumination system
With the new SSAO function, we achieved more natural shadows, boosting the Ambient Occlusion effect in real time.
We added HDRi images to illuminate indirect lighting in the scene to achive a more realistic look.
Matched cameras between unreal editor and client
In this last update, we have tweaked the camera’s values so that the CARLA client looks the same as the Unreal Engine editor and spectator windows.
Doxygen documentation
Added Doxygen documentation online with automatic updates through Jenkins pipeline.
Change Log
- Add build variant with AD RSS library integration with RSS sensor and result visualisation
- Added new sensor: Inertial measurement unit (IMU)
- Added new sensor: Radar
- Moved GNSS sensor from client to server side
- Now all the camera-based sensors are provided with an additional parametrized lens distortion shader
- API changes:
- Lidar: range is now set in meters, not in centimeters
- Lidar: horizontal_angle is now received in radians, not in degrees
- GNSS: carla.GnssEvent renamed to carla.GnssMeasurement
- API extensions:
- Added carla.IMUMeasurement
- Added carla.RadarMeasurement and carla.RadarDetection
- GNSS data can now be obtained with noise
- IMU data can now be obtained with noise
- Updated manual_control.py with a lens disortion effect example
- Fixed pylint for python3 in travis
- Fixed PointCloudIO cout that interfiered with other python modules
- Better steering in manual control
- Added Doxygen documentation online with automatic updates through Jenkins pipeline
- Fixed client_bounding_boxes.py example script
- Exposed RGB camera attribute in the API: exposure, depth of field, tonemapper, color correction, and chromatic aberration
- Fixed materials and semantic segmentation issues regarding importing assets
- Added TrafficManager to replace autopilot in managing the NPC vehicles
- Fixed ObstacleSensor to return HitDistance instead of HitRadius
- New Feature RoadPainter
- Use opendrive information to paint roads
- Add mask to blend different materials between them
- Spawn meshes randomly
- Spawn decals randomly
- Customize texture properties (Brightness, Hue, Saturation, Normal intensity, Roughness Intensity) for each material.
- Optimaze Road Shader by adding the Height map on ORM texture alpha channel Cleaning blueprints Instanced LaneMarking shaders with Road shader
- Decals
- 11 Small tar snakes
- 4 Big TarSnakes
- 4 Big Cracks
- 3 Manhole
- 1 Grate
- 3 RoadPatch
- Navigation Pedestrian
- Change the nomenclature of mesh for each city to be able to export with the plugin “Export Maps”
- Add invisible planes in crosswalks to let cross the pedestrians
- Assets
- Add new meshes Trash: Bag Paper, Bag Plastic, Cigarrete, Can, Cup Paper, Newspaper and leafs
- New streets lights and traffic signs
- New vegetation with more detail: Tree and headge
- Pedestrians
- New Male model
- Improve animations for each character: idle - walk - run.
- Tweak animation controller
- Add Subsurface Scattering material for skins of pedestrian
- Visual Quality
- Match Cameras: UE4 Editor-Espectator-Client
- Match Weather: UE4 Editor-Espectator-Client
- Improve the values of default weather for each Town
- Screen Space Ambient Occlusion
- Bloom
- HDRI
- Fixes
- Fixed Zfighting in all Towns
- Fixed Orientation of cars for each Static Mesh and Skeleton Mesh
- Fixed LOD for all cars and motorbikes
- Fixed vegetation LODs